


Advertisement
Best 10 Easy Pumpkin Carving Ideas for Halloween
It is that time of the year when different varieties of pumpkins in all shapes and sizes are used for Halloween fun & spooky decorations. Do you know that in 2014, according to the U.S. Department of Agriculture, there were 1.91 billion pounds of pumpkins grown in the U.S mostly being used for Halloween decorations? Many pumpkins are turned into traditional Jack-o’-lanterns or other creative carving designs. According to folk tales and ancient beliefs, the night of Halloween when all the dead souls wandered the streets to find their ways home, the flames from lightning the candles, lanterns or bonfires would scare the dead spirits away. It seems the old tale does not scare the kids anymore. Halloween has become a spooky fun night for kids dressed in their favorite costumes to go trick-or-treating. To add the spooky elements to the trick-or-treating, try these super simple carving pumpkin designs to your Halloween decorations.
1. Cinderella's Pumpkin Carriage

Source : Hallmark
Turn the spooky Halloween night to a magical one with this Cinderella’s pumpkin carriage. Pumpkins come in so many different colors. If you prefer a white carriage, choose a Lumina pumpkin. Some Lumina pumpkins are cream, off-white color so to get the color you want, you can use acrylic spray paint to coat the pumpkins.
What you need:
- A medium size pumpkin for the carriage & 4 small size gourds for the wheels.
- 3 ornate metal hardwares, 1 tall rectangle one for the door and 2 small ones for the windows
- 4 ornate drawer knobs for the wheel hubcaps
- 1 lamp finial to add the finish top of the carriage
- 2 wooden dowels about ¼-in. wide for the axles
- 2 orange LED battery operated candle lights
- Carving tools, hot glue gun & some wires or strong strings
Steps to make it:
- Choose a backside of the pumpkin, cut an opening big enough to clean the pumpkin gut.
- Trace the ornate metal pieces onto the front side of the pumpkin and cut the openings for the windows and door. Glue the buckles over the openings.
- Cut the holes on an end of each gourd to fit the dowel. Glue a dowel into 2 holes of 2 gourds to create an axle. Glue the hubcaps on the outside ends of the gourd wheels to finish the look. Make 2 axles.
- Wrap the wires from one axle to the other to create a hammock to support the pumpkin carriage. Add LED candles to the carriage to create a magical effect.
2. Punk-O'-Lantern

Source by Lowe's
Would you like to add a metal hard rock look to your pumpkin? Here is one of a few awesome designs we found at Lowe's. Use your imagination to choose the hardware to create a similar look. To create this Punk-O'-lantern, you would need a drawer handle for a nose, door hinges for ears, a solitary lock for an earring and electric wire cuts for the spiky hairdo. For the free pumpkin face patterns, click onto Lowe's site.
After cleaning the inside of the pumpkin, trace the face pattern onto the pumpkin and start carving out the face. Once you are done, drill the holes to attach the door hinges to both sides of the pumpkin to create the ears, secure with hot glue. Add a lock to the hinge as shown in the picture for the earring. Carve the opening for the nose the length of the drawer handle you are about to use. Insert the drawer handle to the cut, use hot glue to secure it. For the hair, to create the spiky look, cut the electric wire to pieces of 5 inches long. Spray paint the wire cuts whichever color you like. Drill small holes so that you can easily insert the wire cuts in. Now you have a Punk-O'-Lantern full of character!
3. Curly Jack-O’-Lantern

Source by Lowe's
Another simple carving design idea from Lowe’s using electric wire cuts brings this Jack-O’-Lantern to live. Similar to the Punk-O’- Pumpkin, follow the same steps to carve out the face. Cut the electric wires double the length you would want the hair length to be. Wrap the electrical wire cuts around a dowel to form the curls, one at a time. Choose the color to spray paint the curly wires to create the hair color you like for your Curly Jack O’ Lantern.
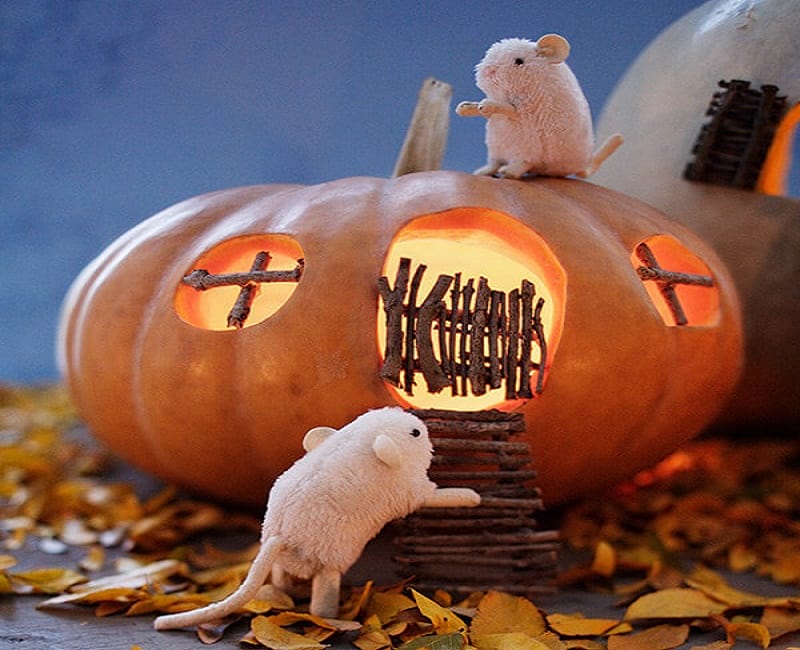
4. Haunted Mouse Cottage Pumpkin
Source by Hallmark
To build this mini mouse cottage, you can choose any pumpkin in medium to large size, some dry & small twigs, a hot glue gun and a couple faux mice.
Clean the inside of the pumpkin. Carve out the openings for 2 windows and a door in the middle of the front side of the pumpkin. Break 4 sticks from the twigs to the length of the window openings, hot glue the sticks to the window openings to create window frames. Break multiple sticks with the length proportional to the height of the door opening; glue them together as in the image to create door and stairs. Glue the structures of the door frame and stairs to the door opening. Add battery-operated LED Halloween light inside to create the warm effect.
5. Green Monster Octopus Pumpkin

Source by Hallmark
If your kids are fans of Monster Inc movie, this monstrous pumpkin definitely stirs lots of scare on Halloween night. With a big pumpkin, a gourd with unique veins to create the look of a bloodshot eye, a pointy red banana pepper for the tongue, some curly long jalapenos for the tentacles and couple simple carvings would get this monster octopus on the move. First, clean the gut of the pumpkin by making a cut at the bottom of the pumpkin. Spray paint the entire pumpkin with green acrylic paint. Once the paint is dry, make the cuts for one big round eye and mouth openings. Insert the gourd for the eye to create a one-eye monster. Glue the pumpkin seeds on the mouth opening for the teeth, save a spot for the red pepper. Glue the red pepper to stick out from 1 side of the mouth just like in the picture to create a tongue sticking out. Glue jalapeno peppers to the bottom of the pumpkin for the tentacles. Now you have completed a scary looking one-eye monstrous octopus.
6. Screech Owl Pumpkin

Source by Hallmark
Another easy to carve pumpkin design from Hallmark, these screech owls require a few simple cut to insert the gourds for the eyes and crooked ginger roots for the feet. Hot glue the feathers & jalapenos for the ears to finish the look.
7. Doomed Couple Witches

Source by Hallmark
You probably might look away those warty-skin pumpkins. However, those pumpkins would make excellent Jack-O’-lanterns for this carving design. The warts on the pumpkin give the pumpkin the look of an old wrinkle scary witch face. This doomed couple pumpkin design from Hallmark is a classic twist of Halloween display of “till death do us part”.
To make the warty old man, choose a pumpkin with lots of warts on the skin. Clean the gut of the pumpkin; cut out the openings for the eyes and mouth. Insert the veiny gourds for the eyes. Use toothpicks or florist wires to attach the mushroom ends or white asparagus cuts as teeth, baby carrots for the ears.
To make the old witch wife, choose a pumpkin with a long crooked stemmed pumpkin to use as a nose. Cut one side of the pumpkin flat and use it as a new bottom to keep the pumpkin stand with the stem side face forward (as in the image). Carve out the openings for the eyes to fit the bloodshot-vein gourds above the stem nose. Underneath the stem, cut a wide opening for the smiling mouth. Add teeth if you like. To finish the look, secure a witch hat on top of the carved pumpkin with hot glue. Now you have a couple old witches who stood by each other until they died and beyond.
8. Ghostly Bride and Groom Pumpkins

Source by Hallmark
It seems Hallmark has a knack for creating doomed duo pumpkins this year. This newly wed pumpkin couple, the bride and groom, are dressed to be ready to spook kids on Halloween night.
To create this altar scare, you will need to find a couple perfectly smooth Lumina pumpkins to save you from spraying paint the pumpkin to white color. After cleaning out the gut of the pumpkins from the bottom, make three simple openings for the eyes & mouth on each pumpkin. Insert the gourds for the eyes. Use toothpicks or florist wire cuts to stick the white asparagus cuts for teeth. You can also hot glue big pumpkin seeds for the teeth. Add a black top hat for the groom and wrap some tulle around the bride pumpkin to create the look of a veil or wedding dress. Now these ghostly bride and groom are ready to exchange their vows, till death do them part.
9. Grinning Goblin

Source by Lowe’s
Not all scary Jack-O’-lantern has to be grumpy. This monstrous goblin (a design from Lowe’s) has a big grin to greet trick-or-treaters. To make this goblin, choose a pumpkin with lots of warts and bumps on the skin. Carve out a big opening for the mouth; be creative with the shape of the mouth. Use that same opening to clean out the gut of pumpkin. Carve three openings for the arms and nose. These should be the same sizes of the gourds you are about to use for the arms and nose. Insert the gourds for arms, nose, and secure them with hot glue gun. Choose three small bloodshot-vein round gourds for the eyeballs. Drill small holes on the gourds and on the top of the pumpkin; attach a small dowel to each gourd eyeball to the pumpkin.
10. Up-hairdo Jack-O’-Planterns

Source by Garden Therapy
This creative design is absolutely adorable and simple to make. Though this Jack-O’-Planterns will not last long to be used as planters but it should hold up well for a few days. For a step-by-step instruction and free patterns, go to Garden Therapy.
Advertisement


